Phantom Directive
Concept
The goal with this project was to create an enjoyable experience while learning more about first person shooting mechanics and using the behavior tree to create enemies that feel dynamic. Level design was also something I wanted to explore here.
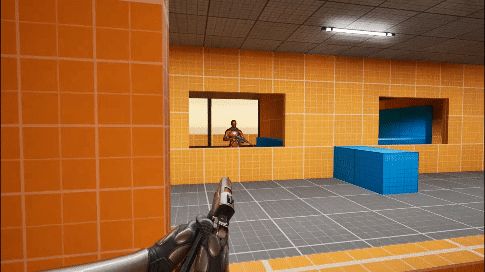
The core idea that I found suitable for this task was to make a tactical first person shooter where the player is meant to feel like a skilled agent that is efficiently infiltrating a headquarter filled with enemies.
2024
Solo project
5 weeks

Key Feature - Free Aim System
1. Designed and implemented a unique free-aim system.
2. Enhanced weapon handling with recoil, animations, and sway.
3. Tweaked values to create a clear gameplay distinction between aiming down sights and hip-firing.
Pillars
Slick Aiming
Aiming should feel smooth and responsive, while still conveying the weight and realism of controlling a character with a physical body.
Reactive Enemies
Enemies should react intelligently and adapt to player actions in believable ways, creating a dynamic and engaging challenge.
Tactical Gameplay
The game should encourage a thoughtful approach to situations, while rewarding quick decision making when situations escalate unexpectedly.
Shooting Mechanics
Aiming
I have always liked the way the gun moves independent of head movement in VR games and somewhat independent in some older Wii games. I wanted to mimic this system with mouse and keyboard to give the player the sensation of moving their arms to aim, rather than simply rotating the entire character. For this I had to plan out a system that allowed me to control camera and player mesh independently.

I started with a third-person template to build a full-body first-person character.To separate camera rotation from mesh rotation while keeping the camera at the head, I attached it to the head socket and enabled "Use Pawn Control Rotation." This setup allows the camera to inherit the head's position but follow the controller's rotation. Since the mesh is rotated horizontally by the controller input, only the vertical aiming remained misaligned with the mesh.

To align vertical aiming and keep the hands in front of the camera when looking up and down, I bend the spine bones to match the camera's forward rotation. I achieve this by setting the Pitch variable based on mouse input, clamping it between -18 and 18. This variable rotates 5 spine bones, creating a range of -90 to 90 degrees (18*5=90).
Mouse input to angle
Apply rotation to spine

Animations / Aiming Down Sights
Animations were created using the control rig, with a camera placed at the head position to observe them in real time during development. Since the bullet is represented by a line trace from the gun barrel, I tested the animations to ensure they functioned correctly in gameplay and impacted the bullet trajectory as intended. For example, walking decreases accuracy because the gun naturally moves from side to side.

Free Aim System
The free aim system in Insurgency: Sandstorm was the closest example of what I wanted to achieve. In that game, free aim is active when the player isn’t aiming down sights, making it harder to aim without the sights. For my game, I wanted to invert this concept, using the free aim system when the player is aiming down sights to make them feel like a highly skilled, tactical agent.
INSPIRATION
With the camera and skeletal mesh rotations decoupled, I created two variables to manage the extra rotation required for free aim, one for horizontal movement and one for vertical. These variables increase or decrease based on mouse input and are applied to the upper spine bone, making the arms move in the direction of the input. To ensure the arms stay within the field of view, these values are clamped. When the player stops aiming down sights, the values interpolate back to zero, resetting the gun position.

Free aim calculations (highlighted in orange)
Apply extra rotation to spine bones to move arms beyond center

Reset aim to center after aiming down sights
Recoil
After implementing the free aim system, I realized players could exploit hip fire, as shots would still land near the center of the screen. Even though I don't intend to use a crosshair, some players can easily guess the center. To prevent this and encourage more deliberate aiming, I wanted different recoil levels for hip fire and aiming down sights (ADS). This would make ADS not just a tool for aiming precision but a necessity to manage recoil effectively.
Beyond the gameplay goal of promoting ADS, my implementation goal for the recoil system was to create a detailed and customizable recoil strength, while also introducing enough randomness to keep the system somewhat unpredictable.
The system starts in the weapon blueprint, where specific recoil values for both hip fire and ADS are defined. These values act as multipliers in the animation blueprint to control how the hands move and rotate with each shot. To simulate the physical impact of firing, I also applied some rotation to the spine.
The recoil effect gradually reduces back to zero, with the weapon stabilizing more quickly when aiming down sights. This system makes ADS a much more effective choice for players seeking precision, and should promote players to use the aim system.
Recoil values in weapon

Get values when firing weapon

Recoil calculation based on weapon input values
Apply recoil on bones

Weapon Sway
To create natural hand sway when rotating, I implemented a HandSwayRotator variable in the animation blueprint. It is used to adjust weapon movement based on mouse input and character motion, with a tighter sway for ADS and a broader one for hip fire.

Mouse input affects the up/down and side sway of arms and hands, while sideways movement affects the weapon twist. These rotation values are interpolated and applied to the hands and spine in the AnimGraph, creating fluid weapon motion.
Hand sway calculation in animation blueprint
Apply sway rotation to bones (hands and spine)

Leaning
I implemented a lean system to emphasize the player's physical presence and encourage a more tactical approach to combat. Leaning allows players to peek around corners while exposing less of their body. The system works by interpolating between positive and negative lean values based on input (Q + E), which are applied as rotations to the spine bones. This creates a natural curve in the spine, making the lean make sense visually and be effective in gameplay.


Enemy Behavior
Patrol Spline
For this project, I used Unreal Engine's behavior tree to create enemy AI. I started by setting up a character to patrol along a customizable spline, where the number of points, placement, and shape can be adjusted. Using the AI MoveTo node, the character moves between points, incrementing the patrol index after each point. When reaching the end, the direction reverses, allowing the character to patrol back and forth along the spline.
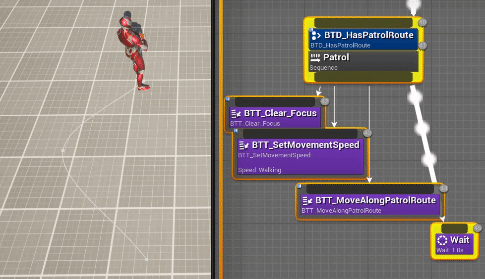
Patrol spline
Behavior tree task: walk along spline
Peak and Fire
To add more depth to their behavior, I implemented a system where enemies peek out before firing and then retreat to cover. Using the Environmental Query System (EQS), locations for peeking and taking cover are identified based on the player's position and line of sight between the enemy and the player, using trace checks.

A behavior tree decorator ensures enemies fire only when the player is within their line of sight, allowing them to shoot while performing other tasks. The decorator also interrupts their movement during peeking when the line of sight to the player is clear, ensuring they only step out far enough to see the player without overexposing themselves from cover.
Hit Reaction
To provide players with immediate feedback when they hit a target, I wanted enemies to react to each bullet impact, with different reactions depending on where they are hit. This not only helps players easily see if and where they hit an enemy but also adds a layer of satisfaction. Seeing enemies respond to your actions makes the gameplay more engaging and immersive.
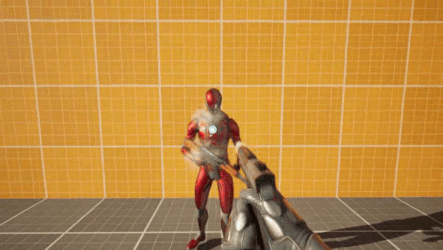
The system is set up so that physics are simulated on the bone that is hit, along with all bones under it in the skeletal hierarchy. Force is applied on the bone in the direction of the bullet trajectory, and then the bone is interpolated back to the position designated by the current animation. This system is additive, so the same bone can be hit many times, resulting in a bigger effect.
Hit reaction component
Level Design
This level was created during a three-week level design course at Futuregames. The goal was to design a level tailored to the project's linear first-person shooter gameplay.
Finding the Concept
I chose to set the level in a modern medtech company, drawing inspiration from real-life locations like Google and Theranos, as well as my own experience working in a similar environment. I thought a location like this would allow me to structure an interesting and linear experience.
I began by listing the types of spaces typically found in such locations. Next, I researched references to identify which spaces could offer engaging gameplay. I decided the player would progress through an office, reception, and labs, culminating in a confrontation in the main target's office.

Level Layout
Once I had this planned out, I drew a simple topdown to set the basic layout of the level. With the goal to have the flow make sense in a real location. I proceeded to make a 3D model of the level in SketchUp to quickly get the idea of the level and started making broad stroke iterations. For example realizing that the labs would be an interesting combat location meaning that they should be a lot bigger than drawn in the top down.


I moved on to create a simple blockout in engine while making smaller changes to the SketchUp plan. In the course we were encouraged to work on the grid so as to make it simpler for artists to replace blockout meshes. From the start I was very careful with placing all objects on a 1m grid and working in a clean way.

Iteration
At this stage, I adopted a more iterative workflow, gathering feedback at various stages of the process. Input from both the teacher and fellow students throughout the course provided valuable insights, enabling me to refine and improve different aspects of the design.
During playtesting, I received feedback that the initial vertical encounter was too steep, making it challenging for players to hit enemies effectively. To address this, I lowered the upper section and replaced the wall with railings. These changes reduced the height difference and provided players with a clearer view, making it easier to target a larger part of the enemies' bodies.

Exterior & guiding player
One of the biggest challenges was ensuring the building made architectural sense. I chose a design featuring large, numerous windows, which required creating areas of the building that the player wouldn’t directly explore to maintain a sense of realism. This meant working in a way that made all the walls and rooms make sense, making me expand beyond the playable area.

Another challenge I addressed was guiding players through the level and making their next objective clear. To achieve this, I focused on line of sight and lighting. I conducted a lighting pass across the entire level, aiming to enhance clarity and navigation while maintaining visual appeal. Importantly, I tried making the lighting feel natural and architecturally consistent, avoiding just placing lights directly above doors solely to guide players.


One example of integrating the guiding light into the level in a realistic way was to create a waiting area at the reception of to make it more clear for players how to move through the office.

Reflections
Through this project, I gained valuable insights by working with the weapon and hand presence in a first person shooter, particularly focusing on how movement, aiming, and shooting impact the overall feel of the game. I also learned how to seamlessly integrate canned animations (e.g., walking and reloading) with procedural animations (e.g., recoil and sway) to create an experience that is both crafted but dynamic.
This level was my first purpose built environment designed to function as a fully realized game level. Previously, my levels were primarily testing grounds for mechanics or small arenas. Taking on this challenge was incredibly rewarding. It not only deepened my understanding of level design principles but also gave me confidence in crafting worlds tailored to specific mechanics. I owe much of this success to the invaluable feedback from my classmates and the excellent guidance of my teacher, Tid Cooney.
The free-aim system presented a particularly tough challenge, but I’m proud of the outcome. From a design perspective, I now understand why such systems are rare in games that use a keyboard/mouse or controller. When aiming near the center of the screen, the aim speed combines the camera rotation with the ADS (aim-down-sights) movement. However, at the edges of the screen, where ADS is clamped to avoid going beyond the screen, the speed depends solely on camera rotation. This creates a dual sensitivity system, aiming feels consistent near the center but slows down at the edges. I believe that avoiding this inconsistency is crucial for fostering muscle memory and improving player experience. This is something I would like to look into in the future and try to solve.